Pixmicro is a webcam viewer with some extra features to make it useful together with a camera guided PCB drill JIG described here.
The main features that makes it useful together with the JIG is support for a movable cross-hair and a circle detection function optimized for detecting holes etched in the copper of a PCB or drilled through it.
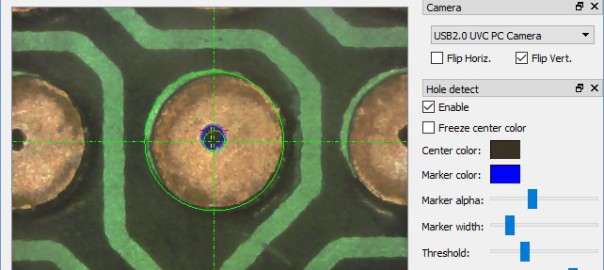
Whenever the cross-hair is placed over a hole in the PCB a circle is drawn where Pixmicro think the edge of the hole is. Pressing a “Calibrate” button will center the cross-hair in this hole. It also render an aiming guide to help you center the hole where the drill bit will enter after calibration.
Using Pixmicro
Using Pixmicro together with the drill jig is fairly straight forward. First you drill a calibration hole in a part of the PCB that is going to be trimmed away (or in a scrap PCB or anything else that leaves a clean hole with enough visual contrast). Then you move the cross-hair over the hole. You should now see a blue tinted circle around the edge of the hole indicating that Pixmicro has detected it. If this don’t happen, you might need to adjust the “Threshold” and “Roundness” sliders to make it properly detect the hole. When it properly detects the hole, you can click the “Calibrate crosshair” button to make it automatically center the crosshair over the calibration hole.
Now you are ready to start drilling the PCB. Move the PCB so the first pad you want to drill is under the crosshair. The pad should have a small hole etched in it for aiming. I post-process the drill-file to make all holes 0.3mm in diameter regardless of actual drill-size. This give a nice aiming point and the small size assures that even if I’m not hitting center 100% I will still have copper to the edge of the hole.
When the crosshair enter the hole, you should see the blue tinted circle again. If you are close enough to the center, you will get a horizontal and vertical aiming guide. When both aiming guides align with the crosshair you have it perfectly centered and are ready to drill. The distance from the aiming guides to the crosshair is 3 times the actual offset from center. This to make it easier to tell when the aim is perfect.
In the first picture the aim is off a bit and the vertical indicator is red to indicate that it is off by a fair bit, and the horizontal indicator is yellow since it is a bit closer.

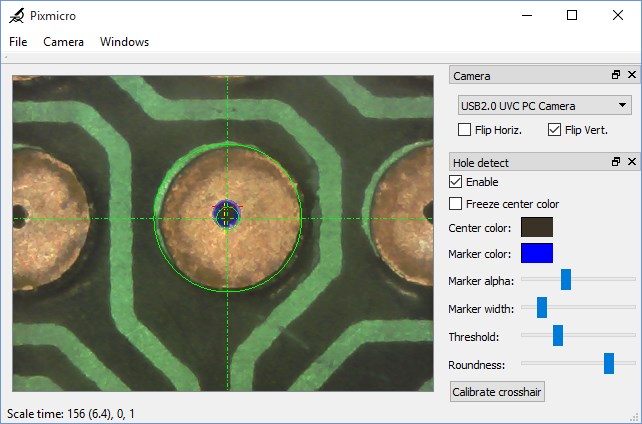
In the second picture the PCB has been moved a bit down and to the right. The horizontal aim is now perfect and the vertical aim is almost perfect (aiming guide is now green).
If you notice that the drill bit start moving away from the crosshair in a consistent direction the jig might have lost calibration slightly (something moved). If so it can easily be re-calibrated by clicking the “Calibrate crosshair” button again after drilling a hole.
User interface
In the “Windows” menu you can open/close 3 different windows. This windows are by default docked along the right edge of the main window, but can be dragged off and made floating. They can also be re-docked along any of the main window edges/corners or combined with each other in a tabbed view.
The windows have the following functions:
Camera
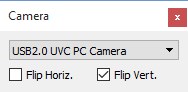
This window allow you to select witch camera to use if multiple cameras are connected to the computer. It also allow you to flip the camera image along any of the two axis. This is useful for the camera jig as the camera is mounted below the PCB and moving it forward on the jig would move it downward on the screen unless you where able to flip the image vertically.
Hole detect
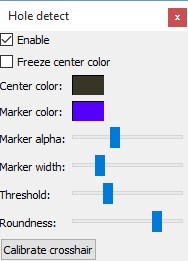
The “Hole detect” window allow you to enable / disable the hole detector and to adjust how it detects the hole and how it present the result.
The hole detector have the following controls:
- Enable – Enable / disable the hole detector.
- Freeze center color – By default the edge of the hole is defined as the point where the color differ enough from the color at the center of the crosshair. By ticking this check box you freeze the color used as a center reference to whatever is currently below the crosshair. This can make the detection a bit more stable if the color the camera detect at the center of a hole vary a bit between frames.
- Center color – Show the color currently used as a center reference. Unless “Freeze center color” is checked, this is the color currently under the crosshair center.
- Marker color – The color used to indicate the hole when detected. Clicking it will open a color picker dialog allowing you select a new color. Move the dialog off a bit to see the changes in real-time.
- Marker alpha – The transparency of the hole indicator.
- Marker width – The thickness of the circle drawn to indicate the detected hole.
- Threshold – Slider selecting how different the color needs to be from the center color for it to be considered the edge of the hole.
- Roundness – The hole is detected by tracing 16 “spokes” from the center of the crosshair and outwards until the edge is detected. Then the longest and shortest spokes are ignored before the hole center and radius are calculated. In a perfect circle all spokes have the same length. In a square the spokes going diagonally will be longer than those going horizontal and vertical. The Roundness slider select how much the spoke lengths are allowed to vary before the detection is rejected.
- Calibrate crosshair – Clicking this button will move the crosshair to the currently detected hole center if any.
Edge detect
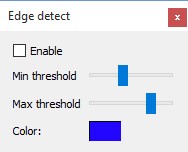
The “Edge detect” window allow you to enable / disable an edge detect filter and to adjust it’s sensitivity. This window is closed by default, and is mostly a result from me experimenting with the OpenCV image processing library. I hope to add more useful filters later.
Download
The latest version can be downloaded here:
64-bit: PixmicroSetup-0.2.exe
32-bit: PixmicroSetup32-0.2.exe
Older versions can be found here:
64-bit: PixmicroSetup-0.1.exe.
Sources
Pixmicro is released under the GPL license, and the sources can be fond on github: http://github.com/kavionic/Pixmicro
HI, Just came upon your wonderful software, but I have an issue with my external microscope camera being detected in your software. It shows it in the pull down list but will not show an image. The camera (just purchased), does work in Windows. Can you give me any suggestions on resolving this please?
I have now finally got around to make a 32-bit build and a new installer for the 32-bit version. I have not been able to test the installer on a clean machine without a developer environment on yet, so if I forgot to add some files to the installer, pleas let me know so I can have them added.
I have also committed the latest sources to github for those who want to build it from source. The latest version should no longer be depended on the CV library for building.
This new version have a few new features that is a bit work in progress and might not be fully functional. But the basic functionality from the old version should still work fine. Let me know if there is any major issues.
Thanks. I tried the 32 bit installer version and good ole Norton flagged as dangerous and removed it.
Ah, yes. Guess you would have to manually convince it that it was safe. I don’t think I’m going to go through the trouble of getting it certified 🙂 Not sure how much hassle and cost is involved in that though…
But good thing you got it building from source then. And if you should desire to have a look at the latest version, it should be even easier to get tot build as it have fewer dependencies.
Happy drilling 🙂
I did cut off Norton enough to get it to download. The virus scan passed. When I ran either 32 bit or 64 bit (on a different machine) and got an error about not having with for a directory. I need to look at the logs to try and figure out what directory. My ID is an admin. Do I have to explicitly run your installer as administrator?
I don’t understand what “with for a directory” means.
I don’t think you need to explicitly run it as administrator. I did not do that when testing the installers before putting them on the server
But I did test by installing on the same machine that I had built them on. So I might have had something available that a machine without an developer environment installed would not have, and that I should have included in the installer.
If you figure out exactly what it is missing, please let me know so I can include it in the installer.
I bypassed norton insight on my 32bit windows 7 machine to download and the new 32bit installer worked. I’ll try it again on my 64 bit machine tomorrow. I it probably be a problem on that box
I guess I had paid enough dues ( 1 1/2 days) trying to get openCV to work under VS 2015 that building your new version was a snap using VS 2015. I didn’t try debug and went directly to release. All I needed to do to get it to execute was to add the qt bin directory to the system path statement. It couldn’t find one of the qt dll files. Started like a charm. Now back to my shop to mount the microscope under my drill press so I can finally drill the PCB i made. Thanks for sharing your software.
What software do I need to use to recompile you program for Windows 32bit? Visual Studio? What version and language? Thanks.
Hi. I’m not in front of a computer right now, but from memory I believe i use developer studio 2013 professional at home. And Qt 5.5 IIRC. It also used to depend on some version of the CV library, but I have recently removed that dependency. Not 100% surer that I have committed the very last changes to github though. I might be able to wrap up the installer when I come home later today. And commit the latest source changes if any.
I’ve made progress getting your older version code to compile under VS 2015 only to learn that you built it with VS 2013 or so. Anyway the toolkit version was wrong for VS 2015. As I type this the openCV is building to work with VS2015. When I get this done I’ll download the new version and compile it since the new installer didn’t pass muster with Norton.
I need to run the code on my 32bit windows 7 laptop so I can take it down to my shop. All I could find to download from MS was Visual Studio Express 2015 to compile your code into a 32bit version.
I’m getting these errors. Do I need to download a base for the video access like OpenCV?
“\bin\moc.exe” “C:\Darrah\PCB\Pixmicro-master\Pixmicro\VideoView.h” -o “.\GeneratedFiles\Debug\moc_VideoView.cpp” “-fstdafx.h” “-f../../VideoView.h” -DUNICODE -DWIN32 -DWIN64 -DQT_DLL -DQT_CORE_LIB -DQT_GUI_LIB -DQT_MULTIMEDIA_LIB -DQT_MULTIMEDIAWIDGETS_LIB -DQT_CONCURRENT_LIB -DQT_WIDGETS_LIB “-I.\GeneratedFiles” “-I.” “-I\include” “-I.\GeneratedFiles\Debug\.” “-I\include\QtCore” “-I\include\QtGui” “-I\include\QtMultimedia” “-I\include\QtMultimediaWidgets” “-I\include\QtConcurrent” “-I\include\QtWidgets” (TaskId:16)
Moc’ing VideoView.h… (TaskId:16)
1> The system cannot find the path specified. (TaskId:16)
I realize this is probably self induced but I wanted to make sure I didn’t miss a pre-req. In the videoView.h I see this #include “ui_VideoView.h”. I can’t find it anywhere on my hard drive or anything useful doing a google search.
on this post I am missing QT. Downloaded and installed. Tried adding to VS 2015. Said it didn’t support C++ express. Still would like you to weigh in on the question I posted today. Disregard this one
Hi- just received my USB microscope to try to emulate your system, but am having an issue with your pixmicro program- I get an error that says, “Program can only be installed on versions of Windows designed for…x64 architecture”. The PC I’m trying to install it on is a x64-based processor according to my system report, but is a 32-bit OS (Win10). Is that the problem? Probably a stupid question…
Yes, 32-bit OS would be a problem. I have only built a 64-bit version of the executable.
I did actually try to select 32-bit right now and build, but it failed. And I do not have time to trouble shoot it right now.
You could go to https://github.com/kavionic/Pixmicro and try to build it yourself. Or upgrade to a 64-bit OS. That you should really do anyway 🙂
When I get some time I might look into making a 32-bit build. I didn’t bothered as I didn’t expect many 32-bit windowses out there by now. But don’t hold your breath 🙂
Thanks for the quick reply! Unfortunately for me what you suggest about building my own with your source files is well beyond my abilities! I’m simply an energetic but not well-trained tinkerer. My main PC works, but I don’t want to use it in my shop, so I have an old XP laptop out there. For now I’ll simply use your previous set-up of Micam and Crosshair. Thanks anyway, but if you ever do get around to a 32 bit version, I’d be super happy!!
One good news, one bad news, and one schizophrenic news.
Good news is that I managed to get it to build in 32-bit. Bad news is that I have not got around to make an installer for that version yet. Hopefully should not pose to much of an issue to make one though.
The schizophrenic news is that the current version have a LOT of development added to it since the one that is currently available. Which is mostly good I guess, but also potentially bad since I have not tested it much. So there might be bugs.
And many of the new features are not 100% finished so it looks a bit half-assed. But should be better than a version that don’t run under your OS 🙂
Most of the new features are more microscope related than drill-jig related. Like image snapshot and measurements (length, area, radius, angles, etc etc).
Will come back when I have an installer ready for it.
It is not only the crosshair that helps you align it. At first I used a generic crosshair utility for the aiming, but found it a bit difficult to line up. So that is why I implemented Pixmicro.
It detects the hole closest to the crosshair and gives indications on how far out you are. One circle is drawn where it thinks the hole are, and another where you are currently aiming.
In addition two color coded lines (vertical/horizontal) indicates how far off you are. Makes it very easy to hit the centre. Even on large holes. I usually modify the gerbers to make all holes 0.3mm before etching though so they only act as drill guides. And then it is not to hard to centre. But sometimes you need to aim at bigger holes, and than the auto detection makes a big difference.
Hi..Great little tool. I’d been searching for a solution for accurate hole drilling and decided along these lines. Don’t you find it difficult to line up the holes with the crosshair and drill ? It’s so sensitive its seems so hard to line up. Thinking some sort of adjustable cross slide to aid lining up.
Many thanks for presenting this.